Sweetened condensed milk (Rus. сгущенное молоко) is a thick sweet substance made by vaporizing water from milk. It is usually produced in tin cans that can last for years (unopened and in refrigerators).
Condensed milk is popular around the world in many desserts dishes and treats. In Russia condensed milk is produced in a tin with a well recognized design: dark and light blue background and white letters.
It is very popular to drink tea or coffee with a spoon (or two) of condensed milk, or spread it over a toast like jam. It is also very popular in desserts such as pirozhnoe Kartoshka or as a filling of various pastries. It’s also loved by many home chefs as an ingedient for an easy delicious cream for cakes – just beating condensed milk up with softened butter, it can’t be any easier.
During Soviet times some people would additionally boil a tin of condensed milk in a pan filled with water. The result is so called boiled condensed milk which has a caramel flavor and colour. Nowadays you can buy this product in the shops.
Origin
Condensed milk was invented in the middle of 19 century by an American Gail Borden. There was a practical need for that – back in the day it was a challenge to keep milk fresh for long. Soon after creation of this product Gail Borden established a company that manufactured condensed milk.
During the American Civil War the U.S. government ordered huge amounts of condensed milk as field ration for solders. This was an extraordinary field ration for the 19th century: a typical 10 oz (300 ml) can contained 1,300 Calories (5440 kJ), 1 oz (28 g) each of protein and fat, and more than 7 oz (200 g) of carbohydrate.
Soldiers returning home from the Civil War soon spread the word. Gail Borden became very prosperous, moved to the county in Texas that was soon called after him- Borden county, and build several other factories which he passed onto his sons.
The popularity of this product was up and down thorough the 20 century, but it has gained its niche – not only condensed milk is good as a ration item for soldiers and survivalist, but it is very popular around the globe in many dessert dishes.
Russian Food Festival held 13-15 September 2013 in Amsterdam, the Netherlands
In 2013, in both Russia and the Netherlands many cultural and festive events were held to celebrate 400 years of friendly mutual relations between Russia and the Netherlands.
On 13-15 September 2013, Amsterdam has seen a Russian Regional Food Festival held in the framework of the Russia-Netherlands Bilateral Year. This food event took place at Museumplein near which the Van Gogh Museum and Rijksmuseum are located. The visitors had an opportunity to try and purchase healthy, exotic and tasty products and get themselves better acquainted with the vast geography of Russia. The introduced foods were from the regions of Russia, for example cured meat and venison jerky from the Nenets autonomous area, cold-water fish from Yakutia, chack-chack honey soaked tart from Tatarstan, smoked guineafowl from Kaluga region, sun kissed fruit from Krasnodar and delicious sea buckthorn jams from the Altai Krai. These food recipes can also be found here on this site.
The guests of the festival were entertained by several cultural and musical show, including the dance performances by the troupe of folklore music from the Republic of Tatarstan.
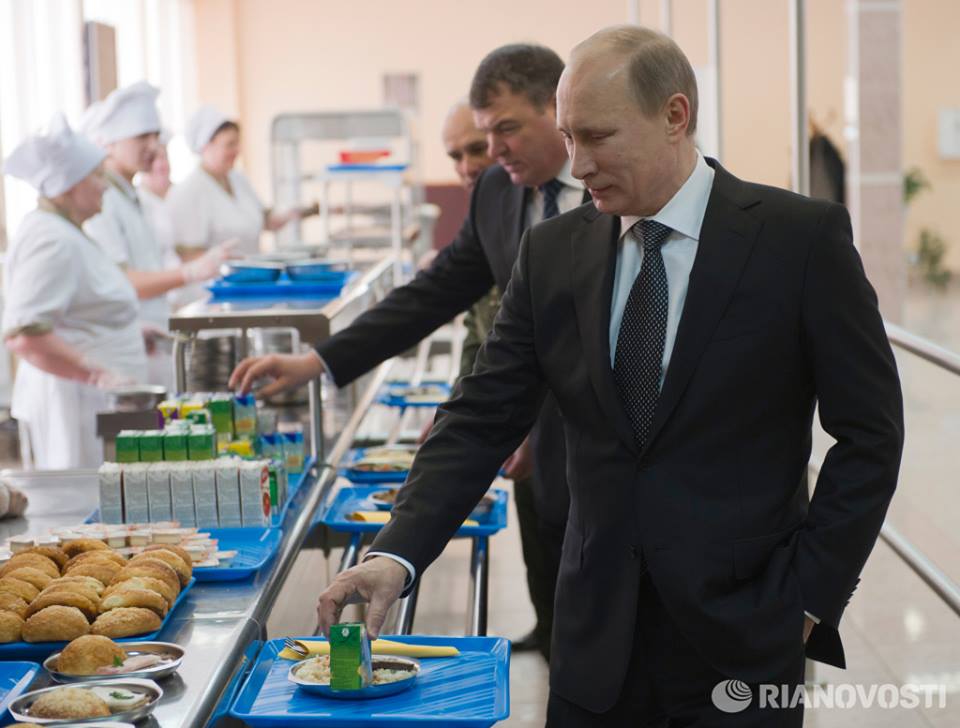
Vladimir Putin, President of the Russian Federation proposes developing “national fast food” enterprises in the regions and believes that national cuisine can compete with McDonald’s.
“We have wonderful cuisine”, Putin says and notes that it is necessary to establish competitive and high quality industrial production of national food products. At the meeting of Board of Legislators, the president noted that regional and municipal authorities need to support small and medium businesses producing “national fast food” by creating favourable conditions for such enterprises.
The president of Russia named quite a few foods he finds delicious and believes in their potential on the market – Ossetian pies, Tatar sweet cake “chak-chak”, belyash pirozhki from the Volga region etc. He concludes “Such catering should provide us with food that looks home-made but is cooked in compliance with industrial production principles.”
It should be noted that McDonald’s has been doing business in Russia for almost a quarter of a century and received more than a warm welcome on its opening day. People were waiting patiently in long queues for a “happy meal” and it was not only about the food, but about the charm of the new and the foreign. Long past are the days of going to McDonald’s for a romantic date, but this fast food giant is always vibrant, especially during lunch hours
A number of other world-known fast food enterprises are holding strong positions on the Russian market – KFC, Burger King, Sbarro etc. However, their local equivalents are starting to spur – “Teremok Russian bliny” and “Kroshka Kartoshka”, but their networks are limited by Moscow and a few major cities.
Other national foods are produced by small businesses or sold by individual entrepreneurs – shaorma wraps – doner kebabs in Armenian style – are very popular. Here and there old grannies are selling pirozhki – cakes with fillings made of cabbage, potatoes or jam. Russian Koreans are selling “Korean style carrot” salad – a local equivalent of khimchi, – as well as crunchy pickled sea weed. The iconic salad “herring under fur coat” was picked up by some industrial producers and now you can find this salad in the shops.
The country has quite abruptly moved from command economy into the market economy and has witnessed with an open mouth the triumph of foreign catering sharks. After all these overwhelming changes and head-over-heels excitement about burgers and chips, people start longing for home-style foods.
Russian cuisine is indeed very rich and diverse, and incorporates culinary heritage of many of its nationalities. Time will show if mass-scale production of such foods can locally beat major fast food companies, but who knows – taste and cultural value associated with national foods are good assets.
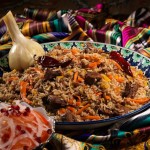
Pilav (Rus. Plov) is a staple Uzbekistan meal, hearty rice with chunks of meat, special spices and vegetables. There are a lot of variations of pilav rice, including recipes where rice is cooked with dried fruit, all covered with a thin sheet of pastry.
Traditionally plov is cooked in the open air, in the large metallic pot called “kazan” (which is similar to a cauldron). And an important traditional ingredient is sheep tail fat, in which the meat is fried (in Russian this fat is called “kurdyuchnyi zhir”, and it might be possible to buy it from the butchers selling lamb in the market).
Spices are very important for the flavour of pilav: cumin seeds (зира), coriander seeds (зерна кориандра), berberis. Dried basil can be used as well, and saffron to enrich the colour. If you can’t find some of the spices, in Russian shops they usually sell spice mixtures for plov that has all of them.
For extra flavour a whole garlic bulb is used (upper peel removed), which get simmered together with rice and then discarded.
What is good about pilav rice that this meal can last you for 2 days, if you choose to cook enough.
Fergan Pilav (plov) in a large frying pan
Ingredients:
Mutton – 350 grams (fatty pieces)
Onion – 1
Carrot – 2 middle sized
Coarse salt – 3-4 teaspoons
Cumin seeds, coriander seeds, berberis – half a teaspoon each
Garlic – 1 bulb
Basmati rice – 350 grams
Vegetable oil
Preparation:
Wash the rice thoroughly so the water is clear; cover with water and let the rice soak. Boil some water. Finely slice the onion into circles; slice the carrot into strips; remove the first peel from the garlic.
In a frying pan, heat vegetable oil until it smokes. Stir-fry onion until golden. Stir-fry chunks of meat till crispy and reduce the heat to low.
Bring carrots, salt, spices and place garlic into the middle of the frying pan. Cover the ingredients with some boiled water. Cover the pan with a lid or a plate and let simmer for about 20 minutes (this bouillon is called zirvak).
After 30 minutes, pour out the remains of water from the soaking rice. Put rice over the ingredients in the pan, even out. Add boiled water so it covers the rice by about 1 cm. Simmer the water out for about 15 minutes. (when the top layer of water is simmered away, you can make holes in the rice with a spoon).
Once the water is evaporized, cover the pan with a lid or a plate and let stand for about 15 minutes. Gently mix, giving a shake, and serve.
Mushrooms are very popular in Russia and many people collect mushrooms in the wild, learning how to tell edible ones from poisonous ones in the early childhood. It is much more then gathering your food – this pastime referred to as “quiet hunting” is a great way to unite with nature, relax and of course it gives you a goal and a challenge – spotting mushrooms is not straightforward because you never know where to expect them and they are often disguised with a leaf or other debris.
The most popular mushrooms are penny buns, chanterelles, birch boletes, honey fungus and most popular dishes are soups, fried mushrooms and pickled mushrooms. Pickled mushrooms are quite popular as an appetizer. Another popular appetizer is julienne – baked mushrooms julienne in béchamel with cheese.
The mushrooms you can see in every grocery are called champignons and they cannot compare with the rich aroma and taste of wild mushrooms. On top of distinctive flavor mushrooms are a great source of proteins, vitamins and important minerals. Mushrooms are suitable for a vegetarian diet. You can get wild mushrooms in the food markets at the end of summer or beginning of autumn.
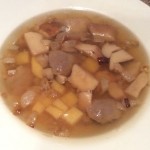
With ceps (Penny buns, Rus. белый гриб) you can make a very simple but delicious soup. The soup is very clear and remarkably rich in flavor. The squidgy mushrooms remind scallops by their soft and moist texture (but not the taste). If you are lucky to spot ceps in your local market don’t hesitate – grab them and make yourself some delicious mushroom soup. I have got these mushrooms on the market in Amstelveen, the Netherlands.
250 gr penny buns
2 potatoes
1 onion
Bay leaf
Some vegetable oil
Peppercorns
Salt
Smetana or yoghurt
Dill (optional)
1. Wash mushrooms, clean from debris and chop into large chunks. Examine the stalk and head for worms. If there are any, pick them out some small worms after chopping. They are harmless and quite common, so if you do accidentally eat a few you’ll be fine!
2.Bring the mushrooms, bay leaf and peppercorns into a pot and pour over 1.5 liters of water. Bring to boil and let simmer for 40 minutes.
3. Meanwhile chop the potato into small cubes and finely slice the onion. Fry the onion until golden in vegetable oil.
4. After 40 minutes add potatoes and salt to the soup. Simmer for 10 minutes.
5. Then add fried onions, simmer for another 5 minutes. Switch off the heat and let infuse for 10-20 minutes.
6. Serve with smetana/yoghurt and finely chopped dill. Enjoy!


