Kholodets is a traditional Russian meat aspic. It is characterized by a rich meaty flavour and jellied texture. It is usually served with mustard or horseradish sauce.
Nowadays, ready kholodets is sold in stores in Russia. Belorussian brands are especially good. However, many housewives still make kholodets at home.
Although it is time-consuming, mostly it is lazy time. The result is well worth the efforts!
Ingredients:
• 2 pig legs
• 1¹⁄₂ kg of bone-in beef
• 1 onion;
• 1 carrot;
• 3 bay leaves;
• salt and pepper — to taste;
• 3 garlic cloves.
Directions
1. Wash the meat under the cold water, cleanse the legs. Cut the onion and the carrot into large chucks.
2. Put the meat and the other ingredients into the slow cooker, add salt and pepper and pour water almost to the edges. Switch the mode “Stewing” and set the timer for 6 hours. When the broth is almost boiling, open the lid and skim off the foam and fat. After boiling, boil the broth for about 5-7 minutes with the lid open, continuing to skim the foam. When foam stops forming, close the lid.
3. When the slow cooker makes the signal cooking is ready, take the meat out from the broth. Separate the meat from the bones, disassemble the meat into fibers and put into molds (i.e. lunch boxes).
4. Filter the broth through a cheesecloth, strain over the meat.
5. Wait until it cools down and put the mold in the refrigerator until it solidifies completely. Serve with horseradish and mustard.
Tip. Add a little bit more salt than usual, when the aspic solidifies, the taste will even out.
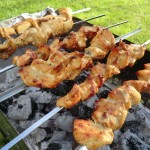
Shashlik (shashlyk, Rus. шашлык) barbecue is not only a meal and a cooking style but also a cultural concept. What can be better than grabbing good cuts of meat, marinating them in accordance with your secret recipe, and cooking it outdoors over char coal with a large company of friends or relatives. Social gatherings accompanied by smoky juicy shashlik are popular throughout the year- both in warm summer days and with white snow at the background. People would often go to the nature which gets more or less wild as soon as you leave a city behind, or to their country houses called datcha (private village house with a some land).
Shashlik can be cooked with any meat, but it should be marinated in advance. There are literally millions of the marinade recipes, and the main ingredient is usually some kind of a softener -it can be vinegar, or kefir (plain yogurt) or onion rings, some would say fizzy mineral water is great. Most popular element in marinating the meat is finely sliced onions – releasing the juicе it softens the meat and enriches its flavour. The meat marinated in advance is brought to the meeting point in a pot and then the magic of the cooking happens.
Chunks of meat are placed tightly to each other onto long metallic skewers and grilled over charcoal in mangal-the BBQ basin. Prior to that the coals must have been burning for about 10-15 minutes and got white and grey ashy coating. Then you keep a watchful eye over shampur (skewer) turning it around, and looking out that the coals don’t start catching fire in which case you would drizzle some water over them. Cooking shashlik is fun and it is certainly an art- an art well worth mastering.
Fresh air helps build up an appetite and so does the delicious smoke, so the expectations are high on the cook. If it the meat comes out great than its a success with a capital S. Plenty of fresh vegetables and ice cold beverages will crown the meal.
What meat can be used: everything – chicken, pork, beef or lamb. Go for the fattier cuts. If the cuts are too lean they can dry when being grilled and to prevent this you might need to oil them for time to time.
We are going to upload a few recipes of shashlik marinade, starting with beef. You’re welcome to add your questions and suggestions or tips in comments!
***
Beef shashlik – Marinade 1.
Rib eye cuts of beef: 500 gr (because it is tender and juicy, and fat is great for grilling)
Marinade (for 500 gr/18 ounces of meat):
3 onions
Coarse Salt- 1 pinch
Black pepper – 1 pinch
Coriander – 2 pinches
Optional:
Provence herbs – a small amount for aroma
Some flakes of crushed dry chili peppers
(we are not going for the spiciness but for the flavour)
Preparation:
Finely slice the onion, bring to a pot and squeeze with your hands to release extra juice (you may want to use swimming goggles for tear free chopping 🙂 )
Wash the meat, cut into chunks, dry up with a paper towel.
Sprinkle all the herbs/spices/salt over the cuts of meat and put the meat into the pot with onion rings. Mix well and leave to marinade for about 2 hours or more.
Prior to grilling, make sure the meat has the room temperature, so if you had the pot in the fridge take it out in advance.
Prepare the coal. Once it’s coated with ashes skewer the meat onto the skewers (shampurs) discarding onions and grill, rotating the skewers and watching that the coats don’t catch fire.
You can also sprinkle some herbs over the coals – rosemary etc. – for extra flavour of the smoke.
Don’t overgrill the meat – slightly press the meat, if it’s not too soft it should be ready.
Serve over a lot of salad and enjoy!
Chicken thighs shashlik
The main condition for making a delicious shahlik barbeque is soaking of chicken in the marinade for a long time. When being soaked, the meat acquires not only a delicate texture, but also unique shades of taste. The kefir marinade is especially good – it is easy to prepare and does not require a large number of components.
Ingredients:
chicken thighs – 2 kg;
low-fat kefir – 1 l;
a bunch of cilantro – 1 pc.;
onions – 3 pcs.;
Garlic cloves- 6 pcs.;
ground pepper, salt – to taste.
Cooking method:
Wash chicken meat under running water, dry on paper towel.
Peel the garlic, pass through a press or finely chop with a knife. Mix the resulting gruel with salt.
Place the thighs in a container for marinating, rub each piece with a mixture of garlic and salt, pepper on both sides.
Peel the onion, cut into thin half rings. Add to meat.
Rinse greens under running water, dry and chop finely with a knife. Add into a container with other components.
Pour kefir over the future shashlik so that the meat is completely covered with it. Mix.
Place the container on the lower shelf of the refrigerator. Marinate for 1.5 to 9 hours, depending on how much time is available. The longer the meat stays in the liquid, the more tender it will turn out over the fire.
String the prepared chicken on skewers (shampurs) or place on the barbecue grill. Roast over coals for 15-17 minutes, remembering to periodically turn over.
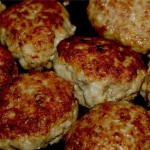
Juicy, rich in flavour Russian burgers (kotleti) is lovely comfort food. This hearty meal will fill your family, and you ca also freeze burgers for quick meals to come. We are happy to share with you all the tipes you need to make the best Russian home-made kotleti burgers – they can easily become your signature dish.
As with pelmeni, the key secret is the meat. Best if you mince it yourself, otherwise get it from a trustworthy butcher or from an organic shop. Fatty pork will make the burgers juicy. You can also pour some water into the minced meat to make it even softer and juicier – leave it for a minute and the meat will absorb it.
Second tip is the seasoning. Finely chopped onion will slightly marinate the meat. Family seasoning tips: crushed bay leaves, some pepper and caraway seeds.
Third tip is an energetic, focused and considerate mixing with your hands (you can wear rubber gloves). The technique is the following: once all the ingredients are mixed in, you take a small portion of the mix and energetically throw it back into the bowl. Be careful not to splatter the meat around – you can place the mix with the minced meat into the bowl.
And finally, and extra touch: once you’ve shaped the meat into the ellipses, you can add a small amount of butter, that will add to the juiciness.
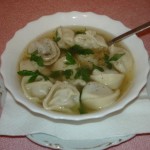
Pelmeni are traditional Russian dumplings stuffed with seasoned minced meat. Pelmeni can served boiled with broth or fried. This delicious meal comes from the Ural region (mountains separating the European part of the country from Siberia and the East). In the language of Komi people who live there “pelmeni” means “ear bread”.
This is a very popular meal and packages of frozen pelmeni can be found in every store in Russia. But making them from the scratch is still a tradition especially due to the fact that the result will surpass supermarkets equivalents.
The process of making Pelmeni will take some time but it is totally worth it- firstly, it can be a fun activity for your family or friends (or even yourself with the right attitude) and secondly and most importantly – you can freeze Pelmeni and keep them for many quick, easy and tasty meals to come.The secrets to delicious pelmeni with juicy stuffing:
meat: It should be high quality and a combination of beef and fatty pork. The fat in pork will account for the juiciness. Ideally you mince the meat yourself or specify what you need to your butcher. As an alternative you can grate some lard into the minced meat.
generously salting the meat, lack of salt will make the meal bland
adding some water to the minced meat
onions
mix the minced meat really well
How to boil pelmeni:
1.Take pelmeni out of the freezer and give them a quick wash under running water to wash away the excess flour.
2. Boil in salted water with a bay leaf and peppercorns on medium or medium low heat. After pelmeni come to the surface boil for another 5 minutes.
To check if pelmeni are cooked take one out and break with a spoon. The dough should be soft and the meat should not be pink.
How to serve boiled pelmeni.
Serve with smetana Or a piece of butter. With or without broth. You can also add chopped dill.
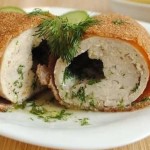
Chicken Kiev (Rus. Котлета по-киевски, lit. ‘Kiev-style cutlet’) is an extravagant dish which is worth the efforts as it will be a pleasure both to the eye and mouth. It is a chicken breast wrapped around garlic and parsley butter, and then breaded or either baked or fried. When you cut through the hot meal, the melted butter with herbs will elegantly leak out adding a chic to the look of the meal.
Despite its name, it is not a Ukrainian but a Russian dish – a Russian culinary historian William Pokhlyobkin tracked the origin of the recipe back to the early 20th century where it appeared in the Moscow Merchants’ Club and later was given its present name – ‘Kiev-style cutlet – by a Soviet restaurant.
In the original recipe, the cutlet is wrapped around the wing bone which then sticks out like a handle. It must be noted though that this extra twist requires a lot of expertise and skills in cutting the meat so it’s more fun watching the professional chefs do it than trying to reproduce the technique on your own. In everyday life you can go with just a normal boneless chicken breast – at the end of the day that bone is just a show-off.
Yum